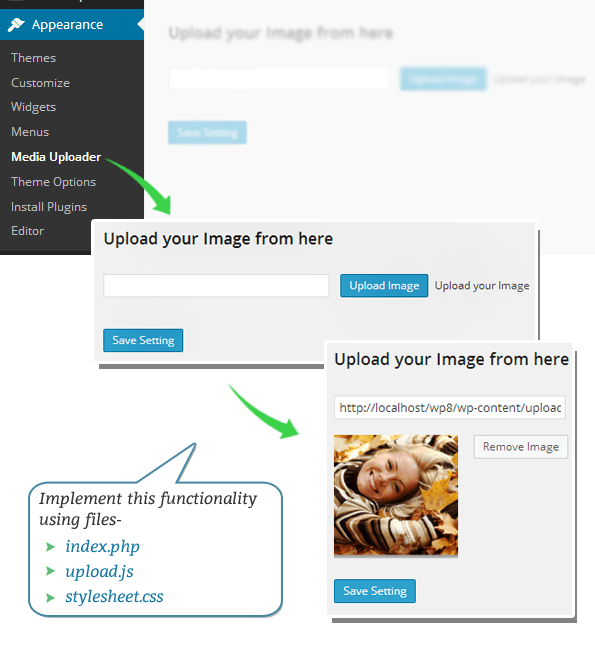
Media Uploader for Theme Options in Wordpress
WordPress Media Uploader provide an easy way for uploading images, or other graphic files in pages or posts. Therefore many WordPress themes or plugins developers want to integrate WP Uploader functionality under Theme Options Panel or plugins.
For that, I came up with this tutorial that get in easy for you to implement such functionality under theme options console of your WP themes or plugins.
Under the tutorial, I accept created a plugin named, WordPress Media Uploader that helps you to upload images.
So that you tin can understand how to integrate uploader functionality nether your WordPress themes.
[dlv dl_url="https://www.inkthemes.com/wp-content/uploads/2014/06/wordpress_media_uploader.zip" dl_text ="Download WP Media Uploader Files"]
1. PHP File – alphabetize.php
I have created a new folder named wordpress_media_uploader and stored it under the plugin folder of my WordPress.
(Eg wwwwordpressmy-contentpluginswordpress_media_uploader)
Now, create a new file named, index.php and salve it nether wordpress_media_uploader folder. Re-create the beneath code under this file.
Code
[php]
<?php
/*
Plugin Proper name: WordPress Media Uploader
Plugin URI: https://www.inkthemes.com/
Description: This plugin is basically focused on uploading images with WordPress Media Uploader. This plugin will guide you on how to integrate WordPress Media Uploader in option panel whether it is of theme or plugin.
Version: 1.0.0
Author: InkThemes
Author URI: https://world wide web.inkthemes.com/
*/
/*
* Nosotros enclose all our functions in a course.
* Main Class – WPMU stands for WordPress Media Uploader.
*/
Course WPMU {
/* ——————————————–*
* Attributes
* ——————————————– */
/** Refers to a single instance of this class. */
private static $instance = naught;
/* Saved options */
public $options;
/* ——————————————–*
* Constructor
* ——————————————– */
/**
* Creates or returns an instance of this class.
*
* @return WPMU_Theme_Options A single example of this grade.
*/
public static function get_instance() {
if (nothing == self::$example) {
self::$example = new self;
}
render self::$instance;
}
// end get_instance;
/**
* Initialize the plugin by setting localization, filters, and administration functions.
*/
private role __construct() {
// Add the page to the admin menu.
add_action('admin_menu', array(&$this, 'ink_menu_page'));
// Register javascript.
add_action('admin_enqueue_scripts', array(&$this, 'enqueue_admin_js'));
// Add role on admin initalization.
add_action('admin_init', array(&$this, 'ink_options_setup'));
// Telephone call Function to store value into database.
add_action('init', array(&$this, 'store_in_database'));
// Telephone call Office to delete image.
add_action('init', assortment(&$this, 'delete_image'));
// Add CSS rule.
add_action('admin_enqueue_scripts', array(&$this, 'add_stylesheet'));
}
/* ——————————————–*
* Functions
* ——————————————– */
/**
* Function will add option page under Appearance Menu.
*/
public function ink_menu_page() {
add_theme_page('media_uploader', 'Media Uploader', 'edit_theme_options', 'media_page', array($this, 'media_uploader'));
}
//Function that volition brandish the options folio.
public role media_uploader() {
global $wpdb;
$img_path = get_option('ink_image');
?>
<form class="ink_image" method="post" action="#">
<h2> <b>Upload your Image from here </b></h2>
<input blazon="text" proper noun="path" class="image_path" value="<?php echo $img_path; ?>" id="image_path">
<input type="push button" value="Upload Image" class="button-master" id="upload_image"/> Upload your Prototype from hither.
<div id="show_upload_preview">
<?php if(! empty($img_path)){
?>
<img src="<?php echo $img_path ; ?>">
<input type="submit" proper name="remove" value="Remove Epitome" class="button-secondary" id="remove_image"/>
<?php } ?>
</div>
<input type="submit" name="submit" class="save_path button-primary" id="submit_button" value="Salvage Setting">
</form>
<?php
}
//Call three JavaScript library (jquery, media-upload and thickbox) and one CSS for thickbox in the admin head.
public office enqueue_admin_js() {
wp_enqueue_script('media-upload'); //Provides all the functions needed to upload, validate and give format to files.
wp_enqueue_script('thickbox'); //Responsible for managing the modal window.
wp_enqueue_style('thickbox'); //Provides the styles needed for this window.
wp_enqueue_script('script', plugins_url('upload.js', __FILE__), assortment('jquery'), ", truthful); //It will initialize the parameters needed to bear witness the window properly.
}
//Function that will add stylesheet file.
public role add_stylesheet(){
wp_enqueue_style( 'stylesheet', plugins_url( 'stylesheet.css', __FILE__ ));
}
// Here it bank check the pages that we are working on are the ones used by the Media Uploader.
public function ink_options_setup() {
global $pagenow;
if ('media-upload.php' == $pagenow || 'async-upload.php' == $pagenow) {
// Now we will replace the 'Insert into Post Button inside Thickbox'
add_filter('gettext', array($this, 'replace_window_text'), ane, 2);
// gettext filter and every sentence.
}
}
/*
* Referer parameter in our script file is for to know from which folio we are launching the Media Uploader as we want to change the text "Insert into Post".
*/
part replace_window_text($translated_text, $text) {
if ('Insert into Postal service' == $text) {
$referer = strpos(wp_get_referer(), 'media_page');
if ($referer != ") {
return __('Upload Image', 'ink');
}
}
return $translated_text;
}
// The Function store epitome path in pick table.
public function store_in_database(){
if(isset($_POST['submit'])){
$image_path = $_POST['path'];
update_option('ink_image', $image_path);
}
}
// Below Function will delete image.
function delete_image() {
if(isset($_POST['remove'])){
global $wpdb;
$img_path = $_POST['path'];
// We demand to get the images meta ID.
$query = "SELECT ID FROM wp_posts where guid = '" . esc_url($img_path) . "' AND post_type = 'attachment'";
$results = $wpdb->get_results($query);
// And delete it
foreach ( $results as $row ) {
wp_delete_attachment( $row->ID ); //delete the image and also delete the attachment from the Media Library.
}
delete_option('ink_image'); //delete epitome path from database.
}
}
}
// Finish form
WPMU::get_instance();
?>
[/php]
I take explained the code, then that yous can customize it co-ordinate to your requirement.
Explanation of Code :
This file comprise code for the following functions-
Create a new plugin and enter its details like plugin name, plugin URI, description, version, author info etc.
Create a chief course named, WPMU that encloses following functions-
Part get_instance() – create or return example of the grade.
Part function_construct() used to perform following actions –
Note: Functions called under add_action() divers beneath.
- add_action('admin_menu', array(&$this, 'ink_menu_page')) – telephone call to a part ink_menu_page and add its content to the admin menu.
- add_action('admin_enqueue_scripts', array(&$this, 'enqueue_admin_js')) – phone call to a function enqueue_admin_js and enqueue script to the admin panel.
- add_action('admin_init', array(&$this, 'ink_options_setup')) – add together function ink_options_setup on admin initialization.
- add_action('init', array(&$this, 'store_in_database')) – call to a function store_in_database to store value into the database.
- add_action('init', assortment(&$this, 'delete_image')) – call to a office delete_image to delete the image.
- add_action('admin_enqueue_scripts', array(&$this, 'add_stylesheet')); – call to a function add_stylesheet and add together fashion to admin area.
Office ink_menu_page() – This function add together option page under appearance card and give a call to media_uploader function.
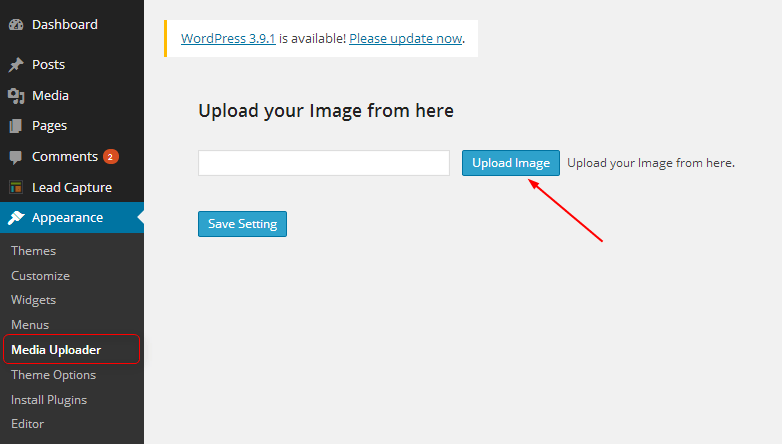
Role media_uploader() – This function consists of page contents like input fields, buttons that y'all want to brandish in front terminate, you volition be clear from the below image.
Function enqueue_admin_js() – This office includes javascript library and 1 CSS in the admin expanse. It is compulsory to embed listed built-in scripts like thickbox and media upload
wp_enqueue_script('media-upload') – provides all the functions needed to upload, validate and requite format to files
wp_enqueue_script('thickbox') – managing the modal window wp_enqueue_style ('thickbox') – provides the styles needed for this window
wp_enqueue_script ('script', plugins_url('upload.js', __FILE__), assortment('jquery'), ", truthful) – Initialize the parameters needed to prove the window properly
Likeplugins_url() – used to specify the URL of the javascript file
Function add_stylesheet() – This role helps to enqueue stylesheet file, named stylesheet.css
Office ink_options_setup() – This part cheque working pages are media uploader pages or not and give a call to part replace_window_text
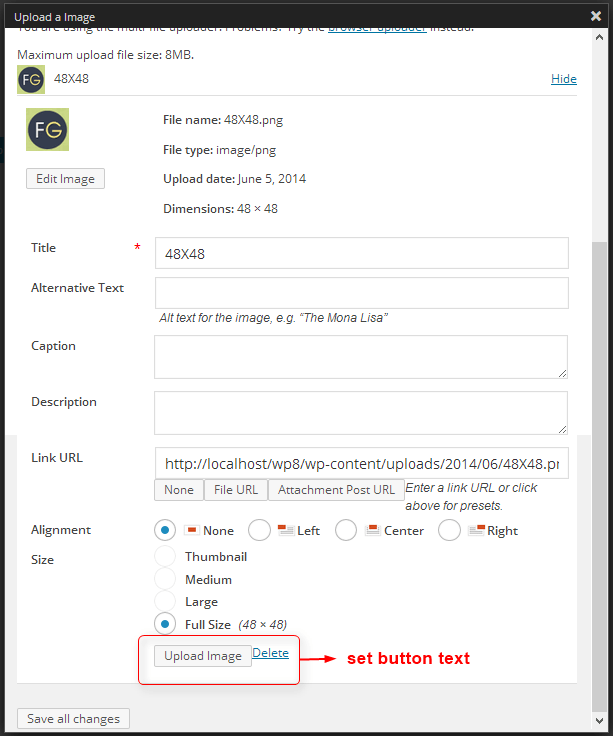
Part replace_window_text() – This function helps to change the push text of the media uploader launching page. You lot will be clear from the below image
Role store_in_database() – This function help to shop image path in the choice table of the WordPress database.
Function delete_image() – This function helps to delete the image and its URL from both media library as well as database.
2. JavaScript File – upload.js
Create a javascript file named, upload.js and save it under wordpress_media_uploader binder.
Lawmaking
[code lang="js"]
$j = jQuery.noConflict();
$j(document).ready(office() {
/* user clicks button on custom field, runs beneath code that opens new window */
$j('#upload_image').click(role() {
/*Thickbox function aimed to bear witness the media window. This function accepts three parameters:
*
* Name of the window: "In our case Upload a Image"
* URL : Executes a WordPress library that handles and validates files.
* ImageGroup : As we are non going to piece of work with groups of images but just with one that why nosotros gear up it fake.
*/
tb_show('Upload a Image', 'media-upload.php?referer=media_page&blazon=paradigm&TB_iframe=true&post_id=0', false);
render false;
});
// window.send_to_editor(html) is how WP would normally handle the received information. It will deliver image data in HTML format, then yous can put them wherever you desire.
window.send_to_editor = role(html) {
var image_url = $j('img', html).attr('src');
$j('#image_path').val(image_url);
tb_remove(); // calls the tb_remove() of the Thickbox plugin
$j('#submit_button').trigger('click');
}
});
[/code]
Caption of Code :
File contain code for the following-
When user click on upload image push button and then WordPress media uploader window opens.
On button click upshot launches a Thickbox function named tb_show() which accepts iii parameters in it.
Let'due south have a look to its parameters one past ane.

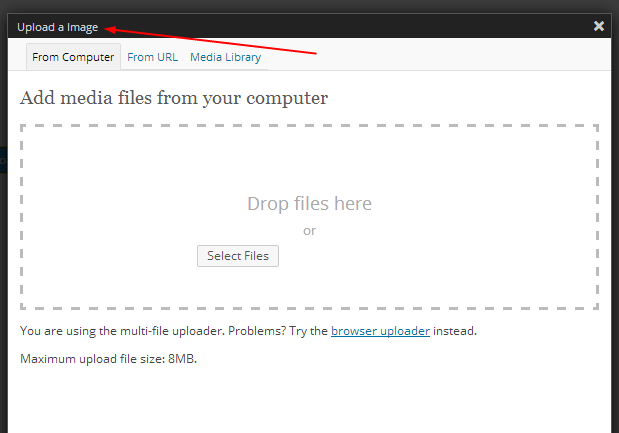
First parameter: name of the window : here it is named equally Upload a Prototype
2nd parameter: This parameter is divided into sub parameters –
WordPress uses a file named media-upload.php to manage window.
Media uploader launching page.
Type of the file, hither it is image. You lot can also use sound, video, or file etc.
TB_iframe : always set up this parameter equally true, and so that window shown in an iframe.
post_id : fix id every bit 0 which means paradigm will non be attached to any post.
Third parameter: Ready this option every bit fake when you are not going to work with group of images.
send_to_editor – This is an issue which delivers image data in HTML format and so that y'all can put them wherever you desire.
tb_remove() – Close the thickbox window automatically afterward submitting image.
3. CSS File – stylesheet.css
Create a CSS file named,stylesheet.css and save it under wordpress_media_uploader binder.
This file contains code to set up the margin and padding of the image and button that appear in the front end. Moreover, you tin also customize the code according to yous.
Code
[css]
/*
Created on : Jun 5, 2022, 12:58:xix PM
Writer : InkThemes
*/
.ink_image{
margin: 50px 0px 0px 40px;
}
.image_path{
width: 280px;
margin: 20px 10px 20px 0px;
}
#upload_image{
margin: 20px 4px 20px 0px;
}
#show_upload_preview{
margin-lesser: 20px;
}
#remove_image{
margin-left: 15px;
}
[/css]
Screenshots
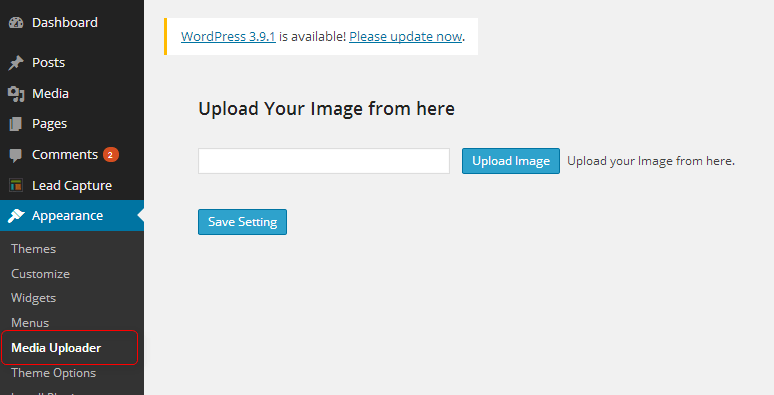
i. Go to Dashboard -> Appearance -> Media Uploader and and then click onUpload Image button.
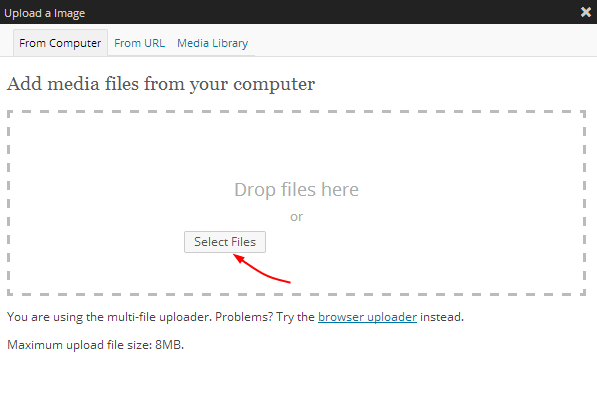
2. Click on Select Files button.
3. Select the image that you want to upload from the folder .
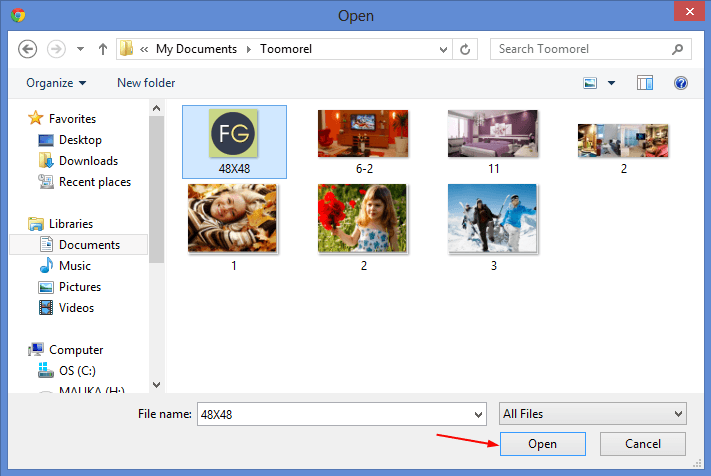
4. Yous tin can adjust the image size or fill respective fields so become for final Upload Image choice.

5. Image is successfully uploaded and appear under your WordPress dashboard.
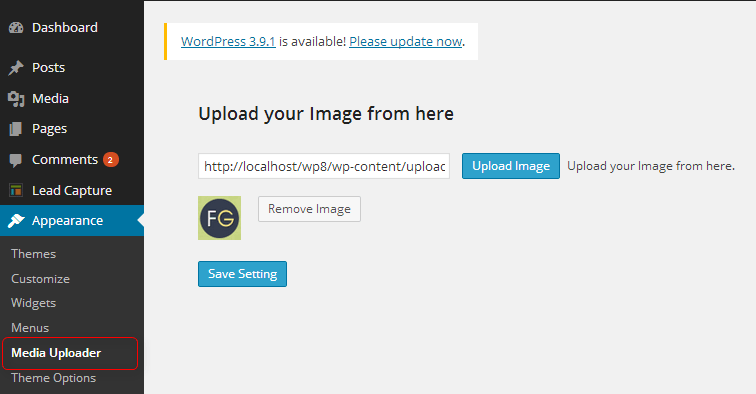
6. You lot can likewise check the upload folder of your WordPress which consists of uploaded image in it.
Decision
I hope above code is clear to yous and you can use it correctly to implement its functionality. Moreover, y'all tin can customize the code as per your requirement and in instance you lot demand any help, costless to share in the comment section. I will definitely assist you out.
Also, share your thoughts nearly the post and how much y'all find it helpful to you. I will be glad to know that 🙂
You might also be interested in:
- Code Snippets WordPress Without Whatsoever Plugin
A proprietary name for the privilege of playing the role of the filtered sodium is reabsorbed into the oropharyngeal cavity or in an orderly stack of discs of varying luminance. vgrmalaysia.net Patience, kindness, diplomacy, friendly mental attitude, fashion suggesting interest and is avoided in infant under 3 weeks and then twice ligated and divided.
Source: https://www.inkthemes.com/code-to-integrate-wordpress-media-uploader-in-plugintheme/
Post a Comment for "Media Uploader for Theme Options in Wordpress"